NOTE: DO NOT attempt this exercise if you suffer from back pain. It is an extreme exercise, and one of the most advanced and demanding stomach strengthening workouts. Younger swimmers should attempt this ONLY with adult supervision.
While throwing a medicine ball back and forth with a partner has always been a great workout, this abdominal set takes it to the next level. In Seated Med-Ball Throw, you replace your partner/opponent with a poured concrete, brick, or tile wall (no masonry or drywall, please). This allows you to sit up and throw the ball as hard as you desire, and the return is much faster, so there is less elapsed time between throws. The main point of this exercise is to contract and develop your stomach muscles, but your arms and back receive a great workout, too!

Just a quick note: The wall-throwing portion of this set cannot be accomplished with all medicine balls on the market. The fluid-filled BACK-IT BALL� and some other balls from performance companies allow this type of rebound.
Why Do It:
This routine increases strength and stability in the core area of your body, leading to better power in your kick and hip rotation. A side benefit is an increase in hand/eye coordination. You should have a solid base of abdominal training before attempting this exercise.
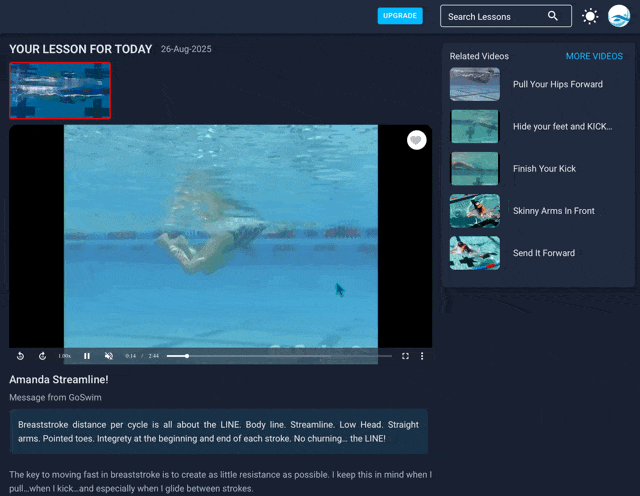
How To Do It:
It is very, very important to employ the #1 rule in this and every other medicine-ball throwing exercise.
RULE #1: While preparing for the return of the ball, ALWAYS have your arms and hands extended in front of your body and face. Instead of waiting for the ball to come to you, try to greet the ball with your hands and let your arms act as the shock absorbers. Most people break this rule only once.
1. Lie down on a pad or mat with knees bent and toes no more than 6 inches from the wall. Hold the med ball with both hands and extend your arms above your head. The ball should be touching the ground.
2. Bend forward at the waist while simultaneously throwing the ball at the wall. Make sure your hands and arms are immediately prepared for the return.
3. As the ball rebounds, catch it in both hands and curl back to your starting position, with arms fully extended above your head and med-ball touching the ground. Sit up and throw the ball again, trying not to bend your elbows too much.
4. After you are comfortable with the timing of the exercise, you can alter the height of the throw to increase the difficulty. Lower throws rebound faster; higher throws force you to hold the contraction of your stomach muscles for a longer period of time while you await the return of the ball.
5. Another variation is to allow your bent knees to fall to one side as you throw the ball to the opposite side.
6. Now put it all together. This part of the set is done for time. Start with 30 seconds, changing your throws from high to low and from side to side. Increase the time only when you can do so and still maintain good form. The longest any one has done it for is 5 minutes, so use that as your top-end goal. It is best to do one long set, rather than to break it up into timed intervals.
7. To further develop your core muscles, immediately following the throwing portion, place the medicine ball between your knees and assume a �back-off-the-ground� stomach-crunch position with your hands behind your head. Corkscrew your body so that your knees and legs fall to the ground in one direction while your upper-body turns the other way. Try not to let your knees touch the ground, and keep your arms up and your elbows in so that you use only your abdominals to control the side-to-side twisting motion.
8. For the last part of this set and with no rest in between, keep the same crunch position with the medicine ball still between your knees, and extend your legs out to an almost knee-locked position, and then return them to a bent-knee position.
These last two exercises can be done for time, but in the beginning are performed for a predetermined number of repetitions. Start with 10 and work up to 30.
How To Do It Really Well (the Fine Points):
Once you are able to do this set for several minutes, progress to a 10-pound medicine ball, then to a 12 pounder.
NOTE FROM GO SWIM: You can read more about Tom Drum, and order one of his fantastic Back-It Balls at www.tomdrum.com. Call Tom at 888-565-9559 for group/team discounts.
Get the latest from GoSwim!


An Official Technique Video
Supplier to USA Swimming.